Studio practice
Ceramic cabinets
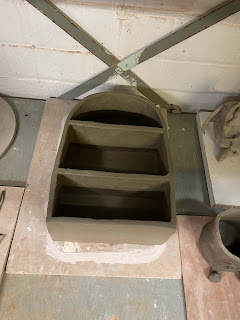
After getting my practice cabinet out of the bisc firing and viewing any flaws it has and things I wanted to change I knew it was time to get creating my final cabinets. My practice cabinet gave me everything I needed from it, it was good and helped me practice the structure I needed but also showed me what I didn’t want, I no longer wanted the rounded square shape and despite loving the comical little feet it was something that was now obsolete due to them being wall hangings instead. I created a template on paper to work from so I could revisit the sizing easily if needed, this also helped keep all the slabs and joining consistent. These cabinets were created through slab building, connecting each piece individually was quite the challenge it was like working against gravity trying to keep everything up, but I slowly got the hang of it and with help from supporting pieces of clay and the hair dryer to dry out the slabs slightly I was able to create nice straight walls. To create a way of attaching these to the wall I made two keyhole holes at the top of the cabinets with these they can be attached with screws to the wall without damaging them. For my first larger cabinet I created I used delta stone ware as I wanted a really nice smooth finish but when I went down to check on it the other day I noticed a small crack, this is from the type of piece I’ve created and the shrinking that happens as it drys; Once glazed and such the crack should be fine but it was definitely something I had to take into consideration when creating the next cabinet. So with this in mind I made my next smaller cabinet with crank clay, this does have a gritty texture but it shrinks a lot less when drying so I believe it’s definitely a better choice. I created this cabinet in exactly the same way, I made a stencil, used the slab method and created keyholes, the only differences are it’s slightly smaller and made with crank. I’m really enjoying making these cabinets and I can see a lot of progression in technique from my practice cabinet to these. I have to create at least one more cabinet this next week but I’m hoping to create two. I shall evaluate more once I have created the last cabinets and glazed them all.
Later Evaluation:
I have decided to switch to crank clay for all my cabinets as the delta stoneware cracked too much during the drying process to the point they couldn’t be saved by the glaze, I have also made the decision to roll the clay out at 1.5 on the rolling machine rather than the usual 1, this created more stability in the walls of my pieces. I chose to glaze all the cabinets in rutile glaze to give a sense of cohesion throughout my piece when displayed. Three out of four of my cabinets have been glazed and are ready for the exhibition, I was worried about this but after doing a mock set up the three cabinets work better than the four would have. I am very pleased and proud with how these cabinets have turned out the only thing I would change next time would be to give the last two cabinets a second layer of glaze so the cream colours came through more.
Photos of the process:


Comments
Post a Comment